
In this article we will discuss Forms Authentication and Authorization and IIS and Secure Sockets Layer.
Security in ASP.Net Sites
Introduction
For mainstream web applications, the basic tasks for implementing security involve:
· Authentication: It is the process of discovering a user’s identity and ensuring the authenticity of this identity. It determines who is working with your application. In ASP.Net application authentication is implemented through one of the four authentication system—
1. Windows Authentication
2. Forms Authentication
3. Passport Authentication
4. Custom Authentication
· Authorization: It is process using which your application decides which operation the user may execute and which resources the user may access.
· Confidentiality: This is the process of encrypting the channel between the client’s browser and the web server. In some applications, you need to encrypt the data in the backend (credit card number etc.) also.
· Integrity: This ensures that the data transmitted between the client and the server is not changed by unauthorized users. Digital signature provides this.
In this article we will discuss Forms Authentication and Authorization and IIS and Secure Sockets Layer.
Basic Forms Authentication
ASP.Net 1.0 and 1.1 had a straightforward method of authenticating users. Forms authentication involved editing the Web.Config file and adding a login page with appropriate authentication code. Our first example explains one such simple login example.
The Web.Config file is edited to force authentication and looks like:
<configuration>
<appSettings/>
<connectionStrings/>
<system.web>
<authentication mode="Forms">
<forms loginUrl ="login.aspx"/>
</authentication>
<authorization>
<deny users="?"/>
</authorization>
</system.web>
</configuration>
In our simple application the username and the password is hardcoded in the application. The login.aspx page has the following functions inside <script/> tag.
protected bool authenticate(String uname, String pass)
{
if(uname == "Tom")
{
if(pass == "tom123")
return true;
}
if(uname == "Dick")
{
if(pass == "dick123")
return true;
}
if(uname == "Harry")
{
if(pass == "har123")
return true;
}
return false;
}
public void OnLogin(Object src, EventArgs e)
{
if (authenticate(txtuser.Text, txtpwd.Text))
{
FormsAuthentication.RedirectFromLoginPage(txtuser.Text, chkrem.Checked);
}
else
{
Response.Write("Invalid login: Check the User Name and Password");
}
}
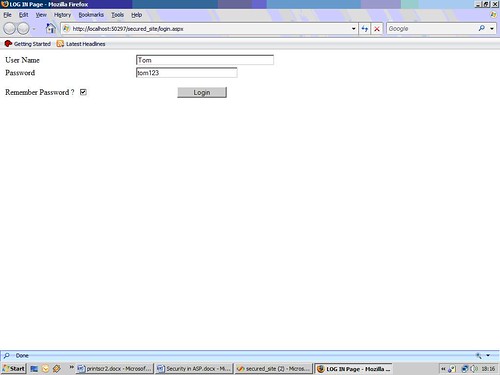
When you run the program the login page appears

On clicking the login page it takes you to the default.aspx

The above example is simple and shows you the basic of a login page. ASP.Net includes a great deal of support for authentication. Most of it comes fro the FormsAuthentication class. In the above code snippet we used it:
FormsAuthentication.RedirectFromLoginPage(txtuser.Text, chkrem.Checked);
This method is used to issue an authentication cookie and render the originally requested page i.e. default.aspx.
Creating Users and Roles
In a real application you would require to assign user identities to different clients visiting your site. For his ASP.Net and Visual Studio provides facilities for managing user identities and roles. In our second example we will look into this aspect. You can download the project files for the entire application.
Let me take you to a tour of ASP.Net’s administration tools using which you can create users and roles as well as assign the users some roles. The Web.Config file is not required to be edited manually. The user profiles are stored inside your application’s APP_DATA folder, using the selected provider. Follow the steps:
1. Go to the ASP.Net Administration Tool by selecting Website|ASP.Net Configuration from the main menu of the website. Go to the Security tab. First click on the Select authentication type link and select From the internet as the access method. This will make your site use Forms Authentication.
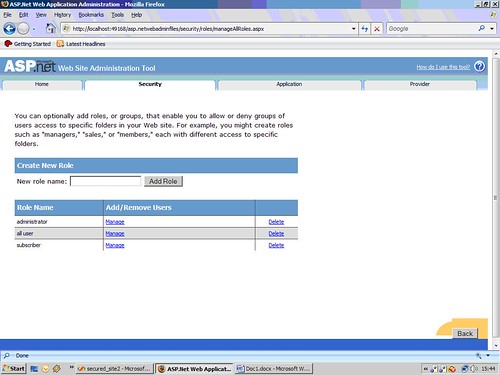
2. Select the Enable Roles and then select Create or manage roles. In our example, we have created three roles.

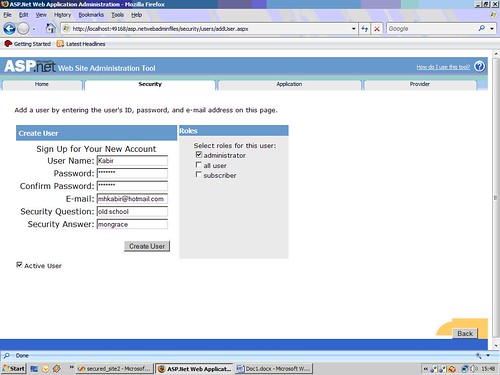
3. You can add some users and assign them some roles

At this stage your web.config looks like the following:
<configuration>
<system.web>
<authorization>
<deny users="?" />
</authorization>
<roleManager enabled="true" />
</system.web>
</configuration>
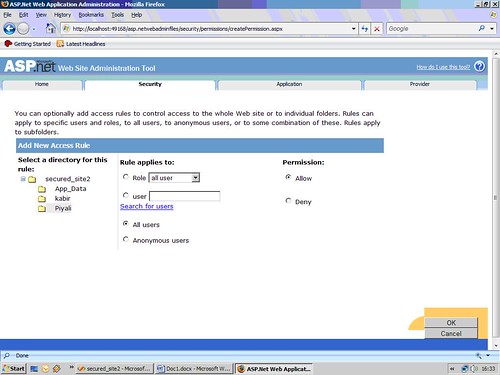
4. click on Create Access Rules link to authenticate your user authorize your users individually to use some part of the site.

5. Add a web form to the site and call it login.aspx. This is going to be your login page. This time add some login control to it. ASP.Net provides lots of login controls. add some folders in the site and give each user access to different folders i.e., different resources in your site.
6. Under in folder, add different web form for each different user. Observe what happens when an unauthorized user tries to visit some other user’s page.
When you run the program it shows the login page. In example program I have created three users:
· Kabir: password – mh_kabir
· Hanif: password – md_hanif
· Piyali: password – piyali_sen

Then after providing the username and passwords it redirects you to the default page.

IIS Authentication: SSL
The Secure Socket Layer or SSL is the protocol used the World Wide Web which allows clients and servers to communicate over a secure connection. With SSL, the browser encrypts all data sent to the server and decrypts all data coming from the server. And at the same time the server encrypts and decrypts all data to and from browser. The URL for a secure connection starts with HTTPS instead of HTTP. You must have observed the small lock displayed by a browser using a secure connection. When a browser makes an initial attempt to communicate with a server over a secure connection using SSL, the server authenticates itself by sending its digital certificate.
To use the SSL in your web application, you need to buy a digital secure certificate from a trusted Certification Authority (CA) and install it in the web server hosting your site. A certification authority is a company which issues and authorizes the security credentials. Common certification authorities are:
As SSL is built into all major browsers and servers, installing a digital certificate enables SSL. SSL strength depends on the strength provided by the certificate and supported by the browser and the server; it refers to the length of the key generated during the encryption process. Following table shows different length available:
|
Strength |
Description |
|
40 – bit |
Supported by most browsers but easy to break |
|
56 – bit |
Stronger than 40-bit |
|
128 – bit |
Extremely difficult to break but all the browsers do not support it. |
To test SSL connections in a local environment, you can request a free trial certificate from an established authority and install in your machine for testing. The IIS Certificate Wizard manages the process of requesting certificates from authorities and install. If a certificate is already installed, the wizard allows you to renew it if expired, remove it or replace it with another certificate.
Conclusion
In this article, we have discussed the security aspects of ASP.Net in a nutshell. To understand SSL you need to download a trial version of a digital certificate and install it. Though you should not work with a trial certificate in real application.
ABOUT MYSELF:
NAME: PIYALI SENGUPTA
QUALIFICATION: B.E., M.C.A
AREA OF INTEREST: WEB PROGRAMMING
HOBBIES: READING AND TRAVELLING
I HAVE MOSTLY WORKED AS A FACULTY. PRESENTLY WORKING FROM HOME.I LOVE MATHEMATICS, ALGORITHMS, PROGRAMMING, FRIENDS, CHILDREN AND NATURE NOT NECESSARILY IN THIS ORDER.YOU CAN CONTACT ME AT: [email protected]