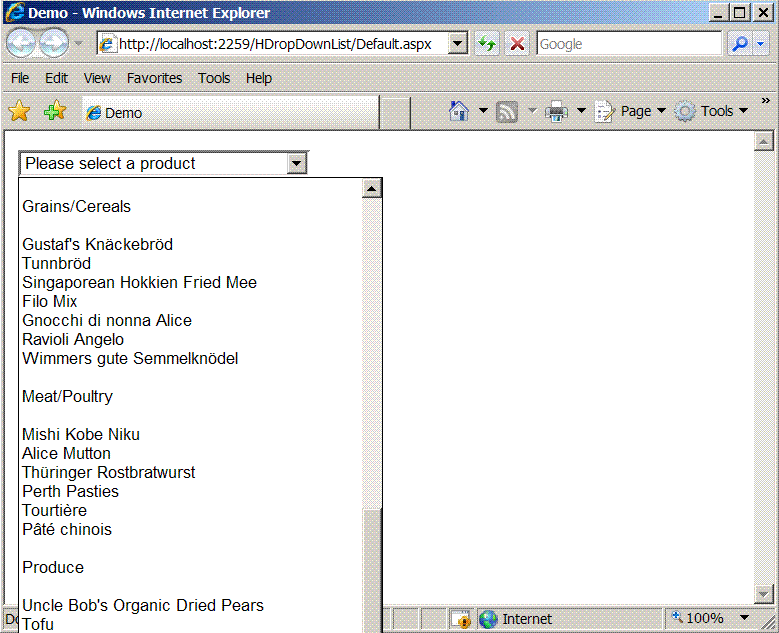

Most of the web applications display hierarchical data. There are numerous ways for presenting the hierarchical data in which, most common is to use the Tree control. Although, the Tree control serves a good purpose for displaying the hierarchical data but in some scenarios we have to find an alternative solution. In this article I will demonstrate how you can use a simple ASP.NET DropDownList control to display hierarchical data.
Introduction:
Most of the web applications display hierarchical data. There are numerous ways for presenting the hierarchical data in which, most common is to use the Tree control. Although, the Tree control serves a good purpose for displaying the hierarchical data but in some scenarios we have to find an alternative solution. In this article I will demonstrate how you can use a simple ASP.NET DropDownList control to display hierarchical data.
Database and Stored Procedure:
In this article I will be using the Northwind database which, is installed by default for SQL SERVER 7 and SQL SERVER 2000 databases. I have added a new stored procedure which returns multiple record sets. The first record set contains the categories and the second one contains the products.
CREATE PROCEDURE [usp_GetProductsForCategories]
AS
SELECT * FROM Categories WHERE CategoryID IN
( SELECT CategoryID FROM Products )
SELECT p.ProductID, p.ProductName,p.CategoryID FROM Products p
GO
Populating the DropDownList:
The next step is to populate the DropDownList with the data from the Northwind database. For, this purpose I have created a BindData method which retrieves the data from the database and populate the DropDownList. Take a look at the BindData method below:
private void BindData()
{
string connectionString = "Server=localhost;Database=Northwind;Trusted_Connection=true";
SqlConnection myConnection = new SqlConnection(connectionString);
SqlCommand myCommand = new SqlCommand("usp_GetProductsForCategories", myConnection);
myCommand.CommandType = CommandType.StoredProcedure;
SqlDataAdapter ad = new SqlDataAdapter(myCommand);
DataSet ds = new DataSet();
ad.Fill(ds);
foreach (DataRow row in ds.Tables[0].Rows)
{
int categoryID = Convert.ToInt32(row["CategoryID"]);
string categoryName = row["CategoryName"] as String;
ddlCategories.Items.Add(new ListItem(String.Empty, String.Empty));
ddlCategories.Items.Add(new ListItem(categoryName, "0"));
ddlCategories.Items.Add(new ListItem(String.Empty, String.Empty));
DataRow[] childRows = ds.Tables[1].Select("CategoryID = " + categoryID);
foreach (DataRow childRow in childRows)
{
ddlCategories.Items.Add(new ListItem((string)childRow["ProductName"], (childRow["ProductID"].ToString())));
}
}
// bind the dropdownlist
ddlCategories.Items[0].Text = "Please select a product";
ddlCategories.Items[0].Value = "Please select a product";
ddlCategories.DataBind();
}
Let’s see what is going on in the BindData method. First I make a connection to the database and populate the DataSet using the stored procedure usp_GetProductsForCategories. Since, the stored procedure returns multiple result sets the DataSet also contains multiple DataTables. The DataTable at index “0” contains the Categories table and the DataTable at index “1” contains the Products table.
Next, we use a foreach loop to iterate through the tables and populate the DropDownList. There are two very important points to note here. First, we are assigning the value “0” to the value of the Category ListItem. This is because we don’t need the Category value as we are only interested in the Product value. Second, is that we are adding empty ListItem objects to the DropDownList items collection. This is to add the space and to make the display better.
The last two lines simply assign the text “Please select a product” to the first item of the DropDownList control. If you run the sample you will see the following output.

Adding the Style:
Although the display looks okay but, it is hard to know that which ones are Categories and which ones are Products. Let’s see how we can make it look much better by adding some custom styles.
private void AddStyle()
{
foreach (ListItem item in ddlCategories.Items)
{
if (item.Value.Equals("0"))
{
item.Attributes.Add("class", "categoryItemStyle");
}
}
}
The AddStyle() method is called each time the page is loaded and adds the style to the Category ListItem in the DropDownList. The “0” value indicates that the ListItem is of Category type and not Product type. The effect is shown below:

Getting the Selected Product:
The last part is to find out that which product has been selected. This is pretty simple as we only need to check the condition that the selected value of the DropDownList is not empty or null and not “0”.
protected void Button1_Click(object sender, EventArgs e)
{
string selectedValue = String.Empty;
if (Page.IsValid)
{
selectedValue = ddlCategories.SelectedValue;
if (!String.IsNullOrEmpty(selectedValue) && selectedValue.Equals("0") == false)
{
lblMessage.Text = "Product is selected";
}
else
{
lblMessage.Text = "Please select a product";
}
}
}
Conclusion: